
The RPM Toe-In Gauge measures total front toe by capturing the distance between the front tires at the rear of the tires, then comparing that same measurement at the front. It’s quick, accurate, and makes it easy to check your vehicle after setup, component replacement or even after a hard crash.
Important: Always measure toe with the vehicle sitting at its normal ride height on a smooth, level surface.
Getting Familiar with the Gauge
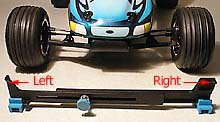 Photo #1 – Identifying the proper sides of the Toe-In Gauge
Stand the gauge on its two stabilizing feet with the blue adjustment knob facing you.
- The left end has two pointer tips (“whale tail”) that contact the tire.
- The right end has a graduated scale and a single pointer.
- Each mark on the scale represents 1° of total toe (½° per wheel).
Note: Throughout these instructions, “left” and “right” refer to your left and right while facing the front of the vehicle, not the vehicle’s left and right.
Step 1 – Capture the Rear Measurement
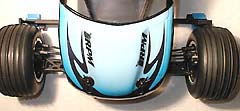 Photo #2 – Capturing the measurement behind the front tires.
Lightly loosen the blue adjustment knob so the gauge slides freely while maintaining light spring tension.
If you’re checking an off-road vehicle, install the supplied risers beneath the gauge as shown in the accompanying photos.
With the front of the vehicle facing you, slide the gauge behind the front tires with the blue knob still facing you (see Photo #2 above).
Choose a tread rib on each tire and use those same ribs throughout the entire measurement.
Place the left pointer against the inside edge of the reference rib on the left tire. Slide the opposite end of the gauge until the right pointer just contacts the inside edge of the matching reference rib on the right tire.
Carefully remove the gauge without changing its setting.
Step 2 – Read the Toe
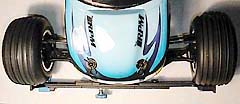 Photo #3 – Reading total toe at the front of the tires.
Move the gauge to the front of the tires while keeping the blue knob facing you.
Place the left pointer against the inside edge of the same reference rib used during the first measurement (see Photo #3 above).
Now look at where the reference rib on the right tire lines up with the graduated scale.
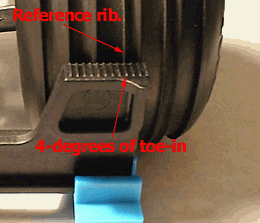 Photo 4: Example showing 4° of total toe-in.
- The outermost mark represents 0°.
- Each mark inward equals 1° of total toe-in.
For example, if the reference rib aligns with the fourth mark, the vehicle has 4° of total toe-in (see Photo #4 above).
If the reference rib falls beyond the 0° mark instead of aligning with the scale, the vehicle has toe-out rather than toe-in. Adjust the steering turnbuckles as needed and repeat the measurement.
Quickly Checking After a Crash
One of the advantages of the RPM Toe-In Gauge is that it can be used to quickly verify your front-end alignment after an impact.
Simply leave the gauge locked at your desired setting. After a crash, place it against the same reference ribs used during setup. If the gauge no longer aligns correctly, your toe setting has changed.
Narrow Chassis Vehicles
Some sedans and narrow-chassis vehicles require the gauge to close farther than the standard adjustment allows.
To do this, remove the blue adjustment knob, close the gauge until the second threaded hole becomes visible, and reinstall the knob in the alternate position.
Vehicles with narrow racing tires or slicks may not have suitable tread ribs to use as reference points. In those cases, use the inside edges of the tires instead.
If chassis clearance is limited, install the supplied risers or place equal-thickness spacers beneath both front tires so the gauge can stand upright behind the tires.
Measuring Toe-Out
Although most RC vehicles are set up with toe-in, the gauge can also measure toe-out.
The procedure is identical except that you begin by measuring in front of the tires and take the reading behind the tires. During this process, the blue adjustment knob should face the rear of the vehicle.